
Taking Solar Eclipse photos for Beginners
As we all know April 8 is a special day for North America and other parts of the world because we will witness a Total Solar Eclipse. Millions of people will watch this amazing astronomy event, and many of them are not photographers or don’t know much about photography. So I thought to write down couple tips & tricks that could help you get the best photos of this event using any camera you have, even your own phone! OMG so exciting right!?
Equipment required
High level, you need to have those 3 items to get a good photo or video of the eclipse:
A tripod
A camera
Solar filters
Type of photos possible for an eclipse


The total eclipse has these phases, and it’s super interesting to capture photos during each phase.
Below are examples of photos taken at various parts of the eclipse.
(Photos by Photopills and Zenderfull)


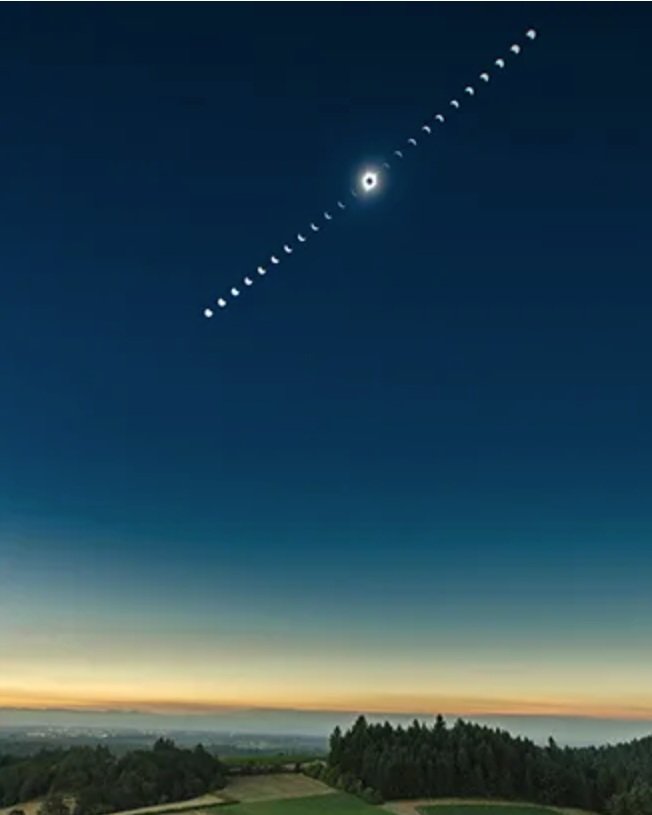
Sun size

Depending on the focal length of your camera lens, the sun size will be different. The above examples with the exception of the last photo were taken with a zoom lens of 500-600mm.
If your lens is wider than 135mm, the sun is going to be really smaller but you can still produce a photo like the one shown the series above.
Choosing a filter
When viewing or photographing the partial phases of a solar eclipse or the maximum phase of an annular eclipse, you must use a solar filter. Even if 99% of the sun is covered by the moon, the remaining 1% crescent is dangerous to view with the naked eye and can cause serious eye damage or blindness.
You will find in general 2 big categories of solar filters, I like to call them expensive and pro solar filters vs amateur solar filters. They both work but the pro ones such as those produced by Thousand Oaks Optical, Seymour Solar and Baader comprise a screw-in thread for the front of your lens and a protective sheet of film. Solar filters are specifically designed for this task and will block UV and IR light beyond the visible spectrum — if in any doubt, opt for one of these.
The other amateur ones, you will find easily on Amazon such as Kase, Lee, Formatt Hitech, and Nisi, make neutral density filters of sufficient strength that they can be used for solar photography as well as other long-exposure photography. Look for 16-stop, 18-stop or 20-stop neutral density filters. Weaker strength neutral density filters will be available, such as a 4-stop or an 8-stop, but these will not offer enough protection — you must only consider filters of 16-stop and above.
In order to find the correct size filter for your lens, look for the thread notation which is usually displayed on the front or side of your lens, sometimes next to the Ø symbol. For example, 82mm or Ø82 means that your lens requires a filter with a diameter of 82 millimeters.
Here is couple links (affiliate) for some filters:
Setting up for the photo

It might be obvious but I want to share some tips for setting up regardless what equipment you have.
Make sure all batteries are charges and memory cards / phone storage is available (do that at least a day before the eclipse)
Clean your equipment from dust or anything
Set up the tripod as low as possible if you can, this will minimize any movement caused by the wind.
Secure your photography area, if you know you will be surrounded by other people, make sure no one steps on your tripod.
If you can have a trigger / remote it will help too minimizing any movements if not please you a delay function.
Remember to always have your solar filter on your lens and only removing it during totality.
Camera settings
Photographing the eclipse when it’s partial
Since this period is really long, I recommend trying many different photos during this phase, and remember you can get those photos at the beginning of the eclipse, then after the totality. This part is for those who have a camera / phone where they can control their settings
REMEMBER TO PUT THE SOLAR FILTER before pointing your camera towards the sun.
Start by making sure you’re shooting raw. This allows you to capture a greater dynamic range and provides more data to play with during the editing process.
Make sure VR/IS is turned off. Vibration reduction or image stabilization is not required while on a tripod. In fact, leaving it turned on will certainly result in a poorer image because your lens will be hunting for motion that isn't there.
Make sure your focus is good, if you’re lucky you will see some sun spots and you can focus on them. Once focus is good, turn OFF auto-focus.
Option 1: Use aperture priority mode.
Here you select an aperture to remain fixed throughout your shoot. Experiment beforehand to establish where your lens is sharpest and has the least chromatic aberration. Somewhere between f/5.6 and f/8 is the sweet spot on many lenses.
Choose an appropriate ISO. Too low, and the shutter speed required will be too long. Too high, and you'll introduce unnecessary noise. You should aim for a base exposure between 1/100s and 1/500s, depending on focal length.
Option 2: Use the full manual mode (advanced)
Here you are controlling everything and this is a bit more advanced.
Use a low ISO of 200
Shoot a series of exposures of the mid-day Sun at a fixed aperture (f/8 to f/16) using every shutter speed from 1/1000s to 1/30s. Select the best exposure using the camera's histogram display.
As the eclipse progresses, the amount of light reaching your camera's sensor will gradually decrease, meaning you may need to increase your ISO as totality approaches.
Photographing the eclipse when it’s total
Certainly the most spectacular phase of the solar eclipse is totality. For a few brief seconds or minutes, the sun’s pearly white corona, red prominences, and chromosphere are visible.
The great challenge is to obtain a set of photographs that captures these fleeting phenomena. During the total phase, all solar filters must be removed. This is because the sun’s corona has a surface brightness a million times fainter than the sun’s visible disk or photosphere, so photographs of the corona must be made without a filter. Furthermore, it is completely safe to view the totally eclipsed sun directly with the naked eye. No filters are needed, and in fact, they would completely hide the view.
Remove the solar filter. Yes now it’s perfectly safe to use your camera without a filter.
The inner corona is far brighter than the outer corona; thus, no single exposure can capture its full dynamic range. The best strategy is to choose one aperture or f/number and bracket the exposures over a range of shutter speeds
You can read more about it in Mr. Eclipse guide here
I only have my phone, can I use it to take photos of the eclipse?!
YES! It’s possible and I will be trying it too! Here are some tips on how you can do that:
Use a tripod for your phone (see the links above)
Turn OFF your FLASH: If you're inside the path of totality, there's one thing you must do to your smartphone — disable the flash before totality. Using flash won't help your photography and, worse, it will detract from the experience of totality for everyone around you. If you don't do this, expect groans and moans in your direction.
Don’t zoom on the eclipse, just use your normal lens or even your wide lens
Lock the focus before the totality happens, this allows the camera to always be in focus.
Use burst mode for totality, if you have earphones, plug them in and use the volume up button to trigger your phone.
Plug your phone in an external battery, remember the eclipse can take up to 3 hours if not more too.
If you’re not sure about your settings, shoot a timelapse.
Advanced method, you’re getting serious 🤩
I won’t fully get into details, but If you are really interested to learn all the details about all possible types of eclipse photography, I recommend purchasing the e-book by Alan Dyer, (This is not an affiliate link).
I hope you enjoyed reading this post and if you go out to see the eclipse and try to photograph it, tag me in your photos I would love to see them!